Spin The Wheel Random Picker – Help & User Guide
Welcome to the official user guide for Spin The Wheel Random Picker. This guide explains how to create wheels, customize colors, add sounds and fonts, share wheels, and use advanced features effectively.
Use the sections below to quickly find help for AI features, wheel customization, spin modes, exporting and importing wheels, audio settings, and keyboard shortcuts. Click any topic to expand detailed instructions.
AI Wheel & AI Colors – Help & Information
What Are These Features?
AI features let you use Google’s Gemini to automatically create fun wheel ideas or color themes in seconds. To use them, you’ll need a Google Gemini API key — it’s completely FREE. Get your key at https://makersuite.google.com/app/apikey.
- AI Wheel – Instantly generates creative wheel options based on your prompt (e.g., “10 funny dares for a party”).
- AI Colors – Suggests beautiful, matching color palettes to style your wheel.
AI requests are processed by Google’s Gemini API. API keys are stored locally on your device and are not sent to our servers. Do not include sensitive personal information in AI prompts.
How to Use
- On the main screen, click or go to Color Management and tap .
-
In the dropdown, choose the auto_awesome AI Generate Wheel tab.
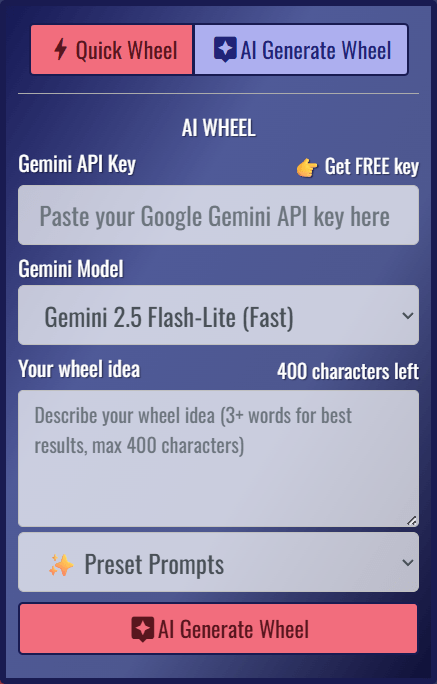
- Paste your Google Gemini API key in the field provided. Note: Your API key is stored locally and never sent to our servers.
-
Select your Gemini Model:
- Gemini 2.5 Flash-Lite (Fast) – Quickest results, ideal for short prompts.
- Gemini 2.5 Flash (Balanced) – Good balance of speed and quality.
- Gemini 2.5 Pro (Smart) – Highest quality and reasoning for complex prompts.
-
Type your idea (max 400 characters).
- AI Wheel: “12 Truth or Dare questions”
- AI Colors: “Easter pastel palette, 7 colors” Tip: Include a number to set how many colors to generate.
- Use ✨ Preset Prompts for inspiration.
- Click to create your wheel or color palette.
- Tap or at the bottom to review or edit your results.
Tips for Better Prompts
- Be specific (e.g., “10 workout challenges for beginners”).
- Keep prompts under 400 characters for faster results.
- AI Wheel: No number = 10 default options.
- AI Colors: No number = 10 default colors. Add “7 colors” or “12 shades” to customize.
Is Spin The Wheel Random Picker Free?
Yes! Spin The Wheel Random Picker is free to download and use.
Some features are available only in the Pro version, including:
- Music backgrounds
- Decision sounds
- Theme background images
- Spin FX
- Spin Sounds
- Spin Animations
💎 Upgrade for a Premium Experience: Unlock the full Pro version to remove all restrictions, and enjoy every feature listed above. To upgrade, simply tap 💎 Buy Pro Version in the ...More menu. Your support helps us keep improving the app!
Is it a one-time purchase? Yes! It’s a simple one-time purchase — no subscriptions or recurring fees. Once you upgrade, you’ll enjoy unlimited slices and all premium features permanently.
What is Spin Animation Easing?
Animation easing is a technique that defines how an animation progresses over time. Instead of moving at a constant speed, easing makes an animation start slowly, speed up, or slow down towards the end. This creates a more natural and engaging visual effect.
Easing is especially important in animations like spinning wheels, where you want to simulate realistic motion—starting fast and gradually slowing down to create suspense.
Below is a list of easing options available in our app (under dropdown menu ) and a brief description of each to help you choose the right one for your needs:
- Power1.easeIn: The wheel starts slow and speeds up towards the middle.
- Power1.easeOut: The wheel spins fast at first and then slows down as it stops.
- Power1.easeInOut: Starts slowly, speeds up in the middle, and slows down towards the end.
- Power2.easeIn, Power3.easeIn, Power4.easeIn: The wheel starts slowly and accelerates more quickly as the easing level increases.
- Power2.easeOut, Power3.easeOut, Power4.easeOut: The higher the number, the stronger the deceleration, with the wheel slowing down more sharply before stopping.
- Sine.easeIn: A slow start that gradually picks up speed.
- Sine.easeOut: A gentle slow-down as the wheel comes to a stop.
- Sine.easeInOut: Gentle acceleration and deceleration. Creating a smooth, flowing motion from start to finish.
- Back.easeIn: The wheel starts by moving back slightly before accelerating forward.
- Back.easeOut: The wheel slows down and slightly overshoots the stop before settling.
- Back.easeInOut: The wheel moves back slightly before speeding up and overshoots before stopping.
- Bounce.easeIn: The wheel moves slowly at first with bounce effects.
- Bounce.easeOut: The wheel slows down with a bouncing effect as it stops.
- Bounce.easeInOut: The wheel starts and stops with a bounce, creating a fun, lively effect.
- Circ.easeIn: A slow start with a smooth increase in speed.
- Circ.easeOut: The wheel spins quickly and then decelerates smoothly towards the end.
- Circ.easeInOut: Smooth acceleration and deceleration.
- Elastic.easeIn: The wheel starts slow with a bit of elasticity and then speeds up.
- Elastic.easeOut: The wheel spins fast and slows down with a "bounce" effect.
- Elastic.easeInOut: The wheel starts and stops with an elastic bounce.
- Expo.easeIn: The wheel starts very slowly and then quickly speeds up.
- Expo.easeOut: The wheel spins quickly and then slows down rapidly near the end.
- Expo.easeInOut: A dramatic start and stop with a rapid middle.
- RoughEase: Produces random variations, creating a jagged easing pattern.
Choosing the Right Easing for Your Wheel Animation
When selecting an easing option, think about the type of effect you want:
For a dramatic stop, try Power4.easeOut or Expo.easeOut.
For a playful animation, try Bounce.easeOut or Elastic.easeOut.
For a smooth, natural motion, Sine.easeOut or Circ.easeOut are good choices.
Power3.easeOut and Power4.easeOut are excellent choices for the Last Man Wins spin mode, providing a dramatic slowdown that builds suspense as the wheel approaches its final stop.
Feel free to experiment with different easing options to find the one that best fits your style!
Managing Your Saved Wheels
You can manage your saved wheels easily from the menu. Follow the steps below to duplicate or delete a wheel.
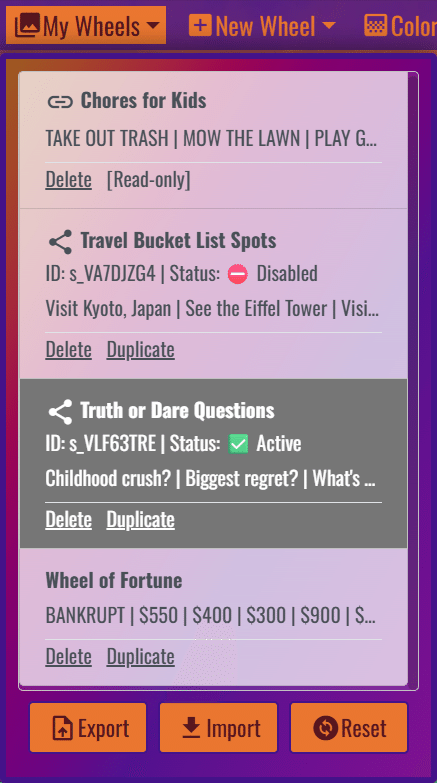
content_copy Duplicating a Wheel
Duplicating a wheel allows you to create an exact copy of an existing wheel. You can then modify the copy without changing your original wheel.
- Click My Wheels at the top of the app.
- Click Duplicate under that wheel’s name.
- A new copy of the wheel will appear in your list, with the same title followed by “(Copy)”
- You can now edit this duplicated wheel freely.
Tip: This is great for experimenting with new themes, colors, or prize sets while keeping your original wheel intact.
delete_forever Deleting a Saved Wheel
If you no longer need a wheel, you can remove it permanently from your list.
- Click My Wheels at the top of the app.
- Locate the wheel you want to delete.
- Click Delete under that wheel’s name.
- A confirmation will appear asking if you’re sure. Click Confirm Delete to permanently delete it.
Note: Deleted wheels cannot be restored, so make sure you have exported or duplicated it first if you might want to use it again.
restore Reset Button
The Reset button is used to completely clear your current wheel list and bring back the default sample wheels that came with the app.
When you click Reset, the following will happen:
- All your custom wheels (any wheels you created, imported, or modified) will be deleted.
- The app will automatically restore the default sample wheels, such as Wheel of Fortune, Yes/No/Maybe, American Roulette Wheel.
This action is permanent — once reset, your custom wheels cannot be recovered unless you previously exported them.
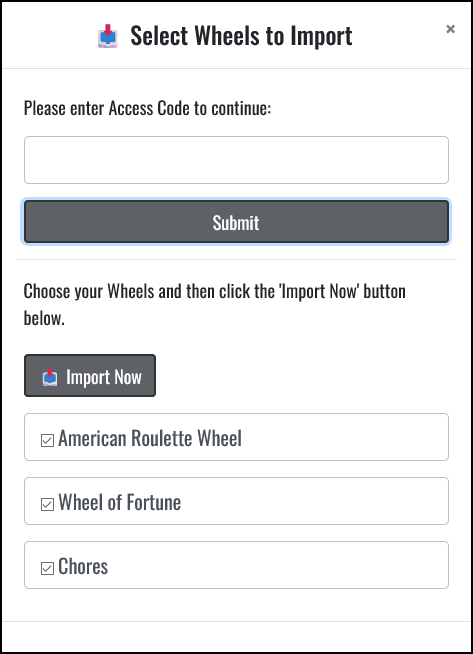
Export and Import Wheels
Exporting and importing wheels is a convenient feature, especially when transitioning between different devices. Whether you're designing wheels on your home computer and need to transfer them to your work computer, this functionality simplifies the process. Simply export the desired wheels from your home computer and import them onto your work computer to seamlessly continue your tasks.
To export your wheels, navigate to the menu and click on the button.
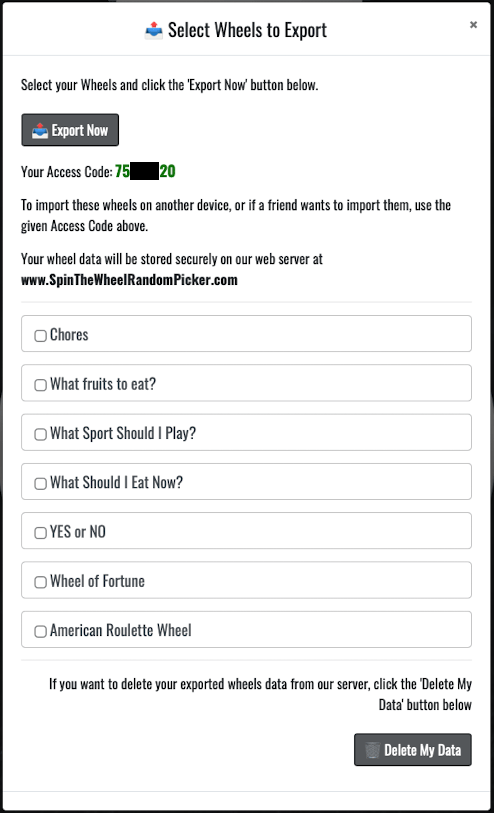
Select the wheels you want to export, then click button. Your wheel data will be securely saved on our web server.
Be sure to copy the Access Code, as you or your friend will need it to import the wheels on another device.
When you're on your work computer, access the menu and click on the button. A dialog will appear, prompting you to enter your Access Code.
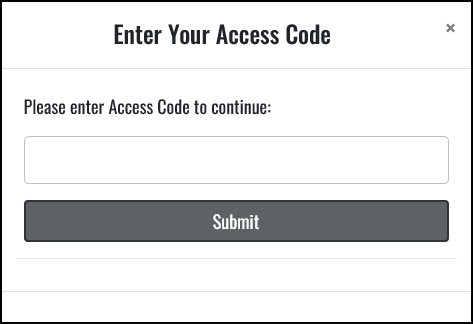
If your Access Code is found on the server, a list of your exported wheels will be displayed. Then, select the specific wheels you wish to import and click on the button. This will seamlessly add your selected wheels to your work computer, allowing you to continue your tasks without interruption.
Create a Shareable Wheel Link
The Share Your Wheel feature lets you generate a unique link for any wheel you create. With one click, your wheel is saved to the server and turned into a shareable URL that others can open and spin instantly.
This is perfect for classrooms, giveaways, team activities, livestreams, or sharing with friends. You can control permissions and manage your shared links anytime.
How to Create a Shared Link URL?
- Open the wheel you want to share.
-
Click the button at the bottom-right of the screen to open Share dialog.

- Write a short description for your wheel to help people understand what it is. This also helps the wheel appear in search results.
- Choose your permission level (for example: read-only or allowed actions depending on your settings).
-
Set the shared link status:
- Active – the link works and the wheel can be opened
- Disabled – the link is temporarily turned off
- Click Generate Share Link URL.
Creating Your Custom Wheel: A Step-by-Step Guide
Build a wheel in minutes — add your options, choose a theme, pick sounds, and spin. Every change is saved automatically, so you can come back anytime.
Step 1: Create a New Wheel
Open the top menu and click . This menu is located near the top-center of the screen.
You can start with:
- Quick Wheel — create a wheel instantly with sample slices.
- AI Generate Wheel — generate wheel ideas from your prompt using Google Gemini (requires an API key).
Step 2: Customize Your Wheel Using the Bottom Controls
After creating a wheel, use the tools at the bottom of the screen to customize how your wheel looks, sounds, and spins. Each wheel can have its own theme, music, effects, and settings.
Set your Wheel Title and enter your wheel Options (one option per line). This is where you define what the wheel can land on.
Themes control the style, visuals, and audio experience of your wheel.
- Background Images — choose a theme image background and wheel style.
- Select Wheel Color — apply color palettes to wheel slices. Use Color Management to create your own palettes (including AI-generated palettes).
- Spin Background Music — play music while the wheel spins.
- Decision Sounds — play a sound when a winner is revealed.
- Spin FX — show visual effects such as Firework, Stage Lights, Star Tunnel, or Confetti. Effects can play during the spin or after the result appears.
- Winner Voice Announcer — speaks the winner out loud using your selected voice/language.
Note: To upload your own music backgrounds, decision sounds, or spin effects, use the top menu Settings. (Some uploads are available in the Pro version only.)
Control how text appears on the wheel.
- Set Font Size — use the slider to adjust text size. Changes apply instantly.
- Set Font Face — choose from many fonts. Use Settings to add your own custom fonts.
-
Text Alignment — Choose where text sits inside each slice:
- Outer — places text closer to the edge of the wheel (often easier to read for long labels).
- Center — places text closer to the middle of each segment (clean look for short labels).
-
Text Orientation — Text orientation changes the direction and style of slice labels:
- Horizontal (Normal) — standard left-to-right text.
- Horizontal (Reversed) — flipped direction for a different visual style.
- Vertical (Normal) — text runs from the center outward.
- Vertical (Reversed) — text runs from the outer edge inward.
- Curved — text follows the curve of the wheel (best for a polished look with short labels).
- Show Segment Borders — Select YES to show borders if you want clearly separated slices. For a modern, flat look, remove borders by select NO.
-
Spin Mode: Normal vs Last Man Wins
- Normal — spins once and picks a winner. You can also enable Auto Pick to select 1 or more winners. If your wheel has 10 slices, the maximum auto-pick winners is 9.
- Last Man Wins — the wheel eliminates slices until only one remains. This mode always picks exactly 1 winner.
- Spin Sound: Choose the sound effect while spinning (examples: Bongo, Bubble Pop, Coin).
- Spin Animation Easing: Easing controls how the wheel accelerates and slows down during a spin. It makes spins feel smooth, dramatic, or playful depending on the style you choose. Learn more about Spin Animation Easing.
- Spin Time: Spin Time controls how long each spin lasts. Shorter times feel fast and snappy. Longer times build suspense and make the reveal more dramatic.
- Slice Repeat: Slice Repeat duplicates your options around the wheel to increase total slice count. This can make the wheel feel fuller and smoother, especially when you have a short list of options.
- Ring Motion Speed: Ring motion is the moving ring/indicator that shows the wheel is ready to spin. Increase this speed for more energy, or lower it for a calmer look.
-
Wheel Text Display: You can control how option text appears on the wheel using the following display modes:
- Show Text: Displays the full option text on each wheel segment.
- Divider (|): Replaces your option text with a simple vertical divider (|) on each segment.
- Color Only: Hides all text and divider symbols. Only the segment colors will be displayed.
Automatic Display Optimization: The app automatically adjusts the display to maintain readability and performance:
- If the text font size is larger than the segment size, the system will replace the text with a divider (|).
- If the divider size is still too large for the segment, the wheel will automatically switch to color-only segments.
When your wheel contains more than 300 slices, both text and the divider (|) will automatically be hidden. In this case, the wheel will display color-only segments to keep the interface clean and responsive. This automatic optimization ensures the best user experience, even when creating very large wheels for classrooms, giveaways, tournaments, raffles, or random name pickers.
Performance tip: If your wheel contains many emoji icons and spinning feels slow or laggy, set Wheel Text Display = “Color Only” to improve performance and achieve smoother spinning.
Quickly turn all audio on or off (music + sounds).
View your past spin results.
Temporarily toggle options on/off without deleting them. Learn about disabling and re-enabling slices.
Adjust slice sizes to change odds (make some options more likely than others). Learn how the Weight feature works.
Create a shared link URL so anyone can open and spin your wheel. Learn how to share your wheel.
Auto-Save: Your Wheels Are Always Saved
Your work is saved automatically inside each time you make changes. No extra “Save” button needed.
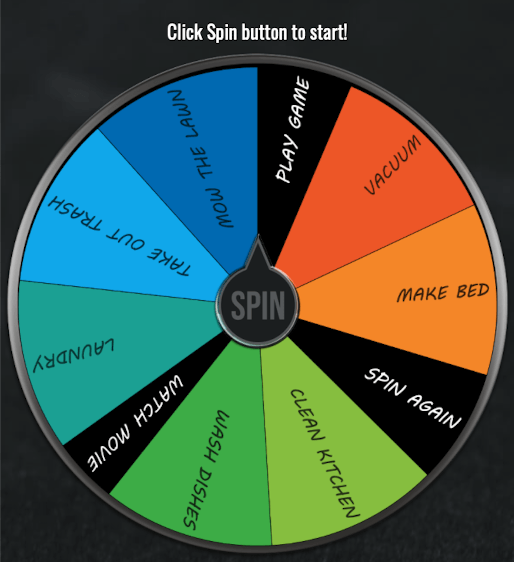
Ready to Spin?
Click the SPIN button at the center of the wheel — or drag the wheel to spin it.
- Spin Button: When you click the SPIN button, the wheel speed is calculated using your Spin Time and Spin Animation Easing. This produces a consistent spin speed every time.
- Drag / Swipe to Spin: Drag the wheel (or swipe/flick on mobile) to control the speed yourself. A longer drag or faster swipe creates a faster spin.
-
How to Stop the Wheel?
- Click the SPIN button again, or
- Click (or touch) and hold the wheel to stop it.
Editing a Saved Wheel
To make changes to a saved wheel, follow these steps:
- Visit the menu
- Select the wheel you want to edit.
- Make the desired changes to your wheel options.
- Your edited wheel will be automatically saved.
Understanding Spin Modes: Normal and Last Man Wins
In the world of Spin The Wheel Random Picker, there are two distinct spin modes to suit your decision-making needs:
Normal Mode
- In Normal Mode, the wheel undergoes a single spin, and a winner is randomly selected. This mode is perfect for quick and straightforward decisions.
Last Man Wins Mode
- When you choose Last Man Wins Mode, you'll notice a regal
 icon next to the SPIN button. This mode offers a thrilling twist to your decision-making process.
 - The wheel takes charge, spinning multiple times and progressively eliminating slices one by one until only one ultimate winner remains. It adds an element of suspense and excitement to the selection process.
- If your wheel has numerous options, we recommend setting the spin time to a shorter duration, such as 5 seconds or less. This ensures you won't have to wait too long to discover the final result.
- Should you wish to stop the wheel mid-spin, simply click the [Stop] button.
With these spin modes at your disposal, you have the flexibility to make decisions in a way that suits your preferences and adds a touch of excitement to the process! 🌟
Understanding fitness_center Weight Feature
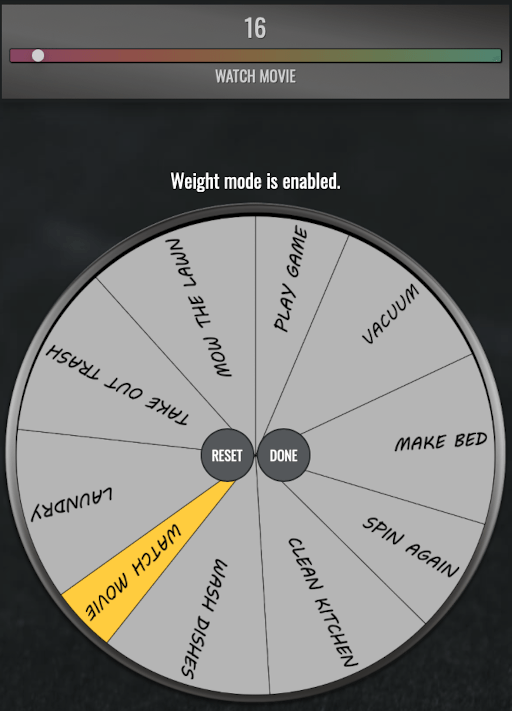
The Weight feature is a powerful tool that allows you to fine-tune the size of individual slices on your wheel. This feature enhances your customization options and provides a more tailored approach to decision-making.
Here's How It Works:
- By default, when you create a new wheel, each slice option has an equal size. This ensures fairness in the spinning process.
- However, there may be scenarios where you want specific choices to have a larger or smaller chance of being selected. This is where the Weight feature comes into play.
-
To adjust the size of a slice, follow these steps:
- First, enable the Weight feature by clicking on the button at the bottom screen.
- Next, select the slice you want to edit.
- Use the slider provided to increase or decrease the slice size according to your preference.
- Once you've made your adjustments, click the DONE button to confirm your changes.
With the Weight feature, you gain more control over your wheel, allowing you to create customized spinners that reflect your unique preferences and decision-making requirements. Enjoy the power of personalized choices! 🌟
Quick Disable/Re-Enable Slices toggle_on
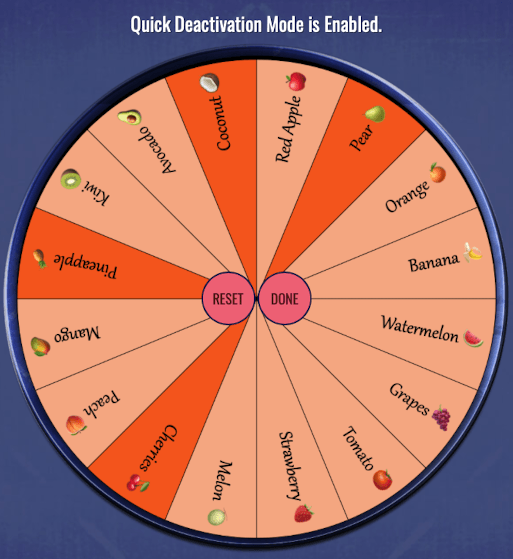
The Quick Disable/Re-Enable Slices feature is a handy tool that provides you with greater flexibility in managing the options on your wheel without altering the original list.
Here's How It Works:
- To get started, simply click on the button at the bottom screen. This activates the Quick Deactivation Mode.
- While in Quick Deactivation Mode, you can toggle the slices on and off by clicking on them. This allows you to temporarily exclude certain options from the spinning process.
- Once you've made your adjustments, click the DONE button to confirm your changes. Your wheel will now reflect the modifications you've made without permanently altering the original list of options.
With Quick Disable/Re-Enable Slices, you have the power to adapt your wheel on the fly, tailoring it to your specific needs without any permanent changes. It's all about convenience and flexibility in decision-making! 🌟
Audio Control
To manage the audio within the app, simply click the button to turn the audio ON or OFF. Toggle between sound effortlessly.
Viewing Wheel Result History
To access your wheel result history, click on the button. This will provide you with a comprehensive view of your past wheel results, allowing you to review your decision-making journey.
Adding Winner Voice Announcer (Windows)
If your desired language isn’t listed, follow the these steps to install or add the language on your Microsoft Windows.
- Open Settings by pressing Win + I or by searching for "Settings" in the Start menu.
- In the search box labeled Find a setting, type 'Speech' and select either 'Change text-to-speech settings' or 'Speech Settings', depending on your Windows version.
- Scroll down to Manage voices and click Add voices
- Locate your desired language in the list, select it, and click Add to install the voice data.
Close and Re-Open Spin The Wheel Random Picker app.
Adding Winner Voice Announcer (macOS)
If your desired language isn't listed, go to macOS Settings > General > Language & Region, then tap Add Language to include it. Close and Re-Open Spin The Wheel Random Picker app.
Enhanced Control with Shortcut Keys on Desktops (Physical Keyboard)
We've equipped our app with a set of convenient shortcut keys to streamline your experience and provide quick access to essential functions. Here they are:
- F1 (or Ctrl + H) Open this help page.
- Space Bar or Enter: To set the wheel in motion or bring it to a stop, just tap the Space Bar or Enter key.
- Escape (ESC): Use the Escape key (ESC) to close the Spin Result, Help modal window or as a convenient Close (Go Back) button.
- F11: Toggle Full Screen.
- Alt + N (or Ctrl + N): Create a New Wheel or, if you're working with colors, Create a New Wheel Color.
- Windows: Alt + C (Mac: ⌘ + Shift + C): Access Wheel Color Management.
- Windows: Alt + I: (Mac: ⌘ + Shift + I): Access Settings page.
- Windows: Alt + A: (Mac: ⌘ + Shift + A): Add a Color Option when needed.
- Windows: Alt + D: (Mac: ⌘ + Shift + D): Duplicate your selected Wheel, or if you're working with colors, Duplicate the Selected Wheel Color.
- Windows: Alt + X: (Mac: ⌘ + Shift + X): Delete the Selected Wheel or, for colors, Delete the Selected Wheel Color.
- Windows: Alt + R: (Mac: ⌘ + Shift + R): Reset All Wheels to Default settings, or if you're working with colors, Reset All Colors to Default.
- Windows: Alt + S: (Mac: ⌘ + Shift + S): Shuffle Wheel Options effortlessly to add an element of randomness.
These shortcut keys are designed to make your experience smoother and more efficient, ensuring you have full control at your fingertips. Enjoy the convenience of quick access and improved functionality! 🌟